富文本编辑器Quill源码分析
最近在产品中遇到了定制富文本编辑器的场景,发现quill比较符合业务需求。在后续的开发中发现quill的使用体验和扩展性都比较好,源码也比较简洁,因此决定看一下quill的源码。
<!--more-->
本文使用Quill版本v1.3.7,主要整理Quill几个比较重要的模块和结构,以及一些富文本功能的实现,并不会深究源码细节
1. Delta
quill-delta是另外一个依赖库,它是基于JSON的、用来描述富文本内容及变化的数据模型。
只要给定了delta数据,就可以按照这些数据还原出富文本内容。可以在quill playground直观地体验变化
按照国际惯例试试Hello World!,
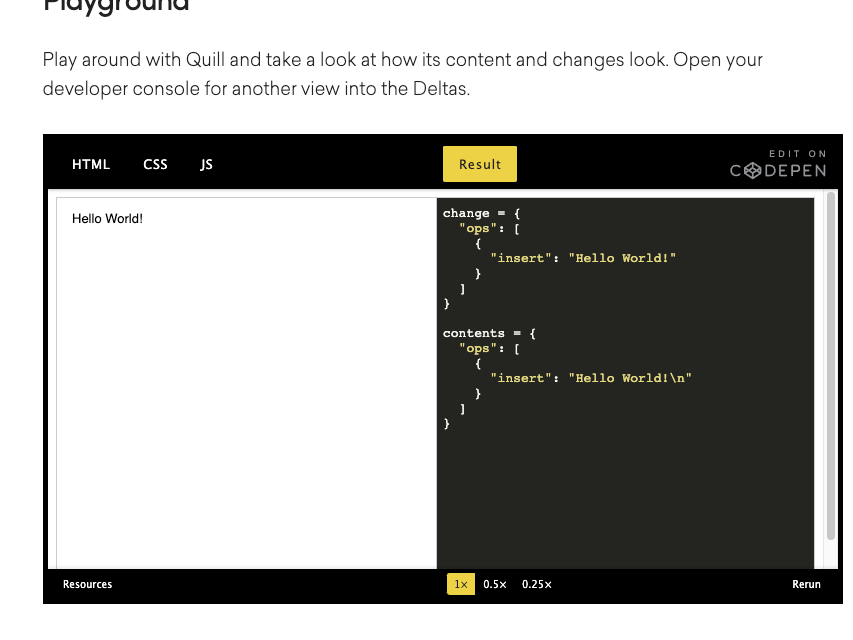
对应的delta就是
{
  "ops": [
    {
      "insert": "Hello World!\n"
    }
  ]
}然后将World!加粗
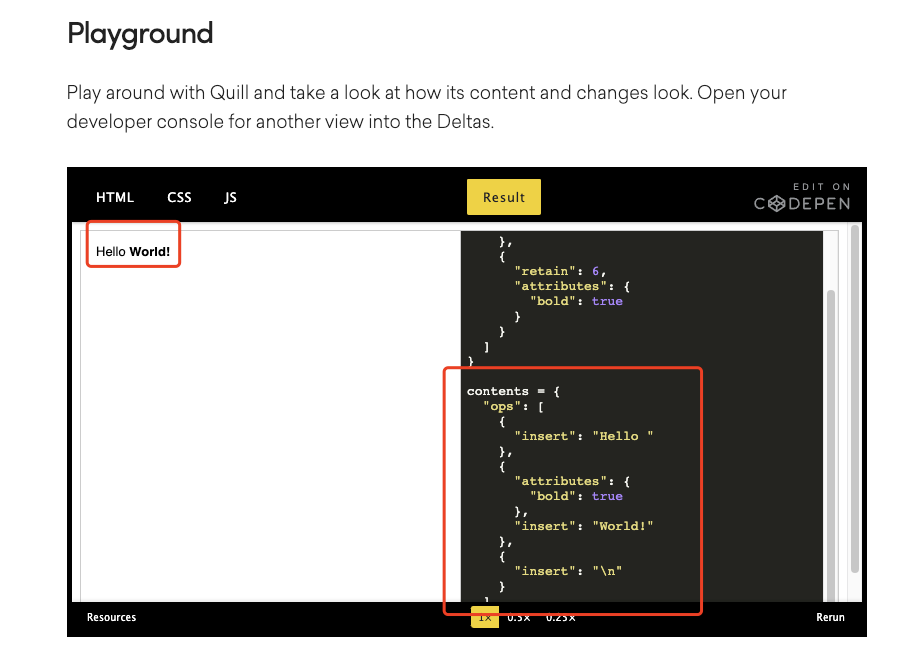
对应的delta就是
{
  "ops": [
    {
      "insert": "Hello "
    },
    {
      "attributes": {
        "bold": true
      },
      "insert": "World!"
    },
    {
      "insert": "\n"
    }
  ]
}
对应的变化是
{
  "ops": [
    {
      "retain": 6
    },
    {
      "retain": 6,
      "attributes": {
        "bold": true
      }
    }
  ]
}删除末尾!,对应的变化是
{
  "ops": [
    {
      "retain": 11
    },
    {
      "delete": 1
    }
  ]
}这样就看见了三种操作insert、retain和delete。
看起来delat与向量Vector在某些概念和操作上比较相似的,具体的计算方法可以看其源码实现
2. Quill
quill的另外一个核心依赖库是Parchment,会在下一个章节进行分析。
回到编辑器本身,我们来看看整体结构
const editor = new Quill()从构造函数开始
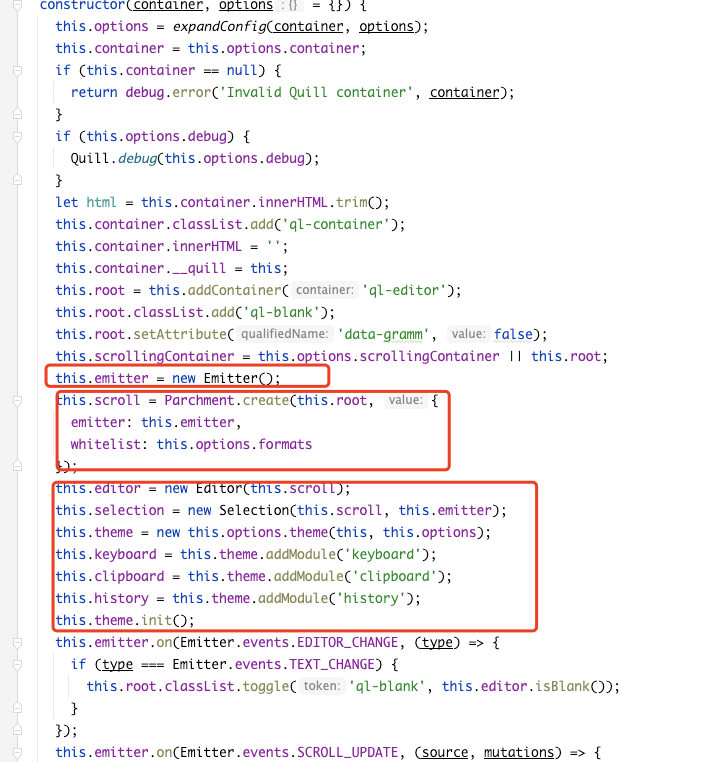
构造函数里面初始化了各个模块,挑一些重要的看一下
2.1. emitter
就是一个继承EventEmitter事件通信的类,提供了emit、on、once等常用功能
2.2. scroll
this.root = this.addContainer('ql-editor');
this.scroll = Parchment.create(this.root, {
  emitter: this.emitter,
  whitelist: this.options.formats
});在Parchment.create之后,root节点就添加了可编辑属性,来看一下
export function create(input: Node | string | Scope, value?: any): Blot {

  let match = query(input);
  if (match == null) {
    throw new ParchmentError(`Unable to create ${input} blot`);
  }

  let BlotClass = <BlotConstructor>match;
  let node = input instanceof Node || input['nodeType'] === Node.TEXT_NODE ? input : BlotClass.create(value);
  return new BlotClass(<Node>node, value);
}
这里query参数返回的match构造函数是个关键,query函数的主要作用是根据传入的DOM节点找到对应的Blot类,大概原理就是遍历classlist,找到Blot className符合条件的Blot类
在quill项目初始化时通过Parchment.register注册了各种在quill实现的Blot,
// quill/core.js
Parchment.register(Block, Break, Cursor, Inline, Scroll, TextBlot);

// 对应的Scroll
class Scroll extends Parchment.Scroll {
  constructor(domNode, config) {
    super(domNode);
    this.emitter = config.emitter;
    if (Array.isArray(config.whitelist)) {
      this.whitelist = config.whitelist.reduce(function(whitelist, format) {
        whitelist[format] = true;
        return whitelist;
      }, {});
    }
    // Some reason fixes composition issues with character languages in Windows/Chrome, Safari
    this.domNode.addEventListener('DOMNodeInserted', function() {});
    this.optimize();
    // 添加contenteditable
    this.enable();
  }

}
Scroll.blotName = 'scroll';
Scroll.className = 'ql-editor';在初始化时由Parchment注册Scroll,然后在Quill的构造函数里面向root节点添加了ql-editor类名,因此这里的query返回的是Scroll,
关于Blot的更多内容,可以阅读上一个章节:Prachement。
2.3. editor
其主要功能就是将delta展示成真实内容
class Editor {
  constructor(scroll) {
    this.scroll = scroll;
    this.delta = this.getDelta();
  }
  // ... 相关方法
}
在quill构造函数最后看到了这样一行代码,感觉有点奇怪,
let contents = this.clipboard.convert(`<div class='ql-editor' style="white-space: normal;">${html}<p><br></p></div>`);
this.setContents(contents);后来发现他的作用貌似是让换行从默认的div变成p,有一点hack哈哈
由于整个编辑器是一个contenteditable="true"的div,因此对应的编辑器操作会被浏览器接管,在默认情况下,按回车时浏览器插入的是div,上面代码的作用就是将div变成p
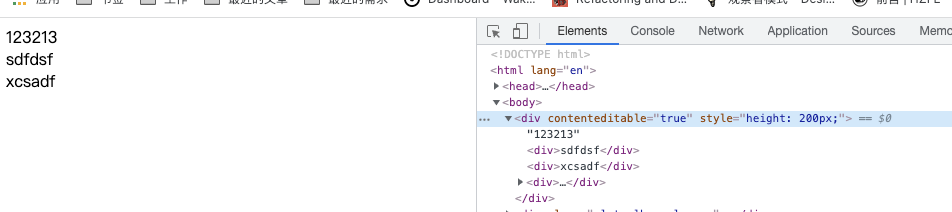
除非有p标签,这个时候按回车会变成p

由于quill需要的是delta数据,而contenteditable编辑输出的是HTML内容,因此需要在编辑时将对应的html转换成delta,来看看这个过程
前面提到整个编辑器是一个ScrollBlot,在编辑时触发update
class Scroll extends ScrollBlot {
  // ... 省略其他
  update(mutations) {
    if (this.batch === true) return;
    let source = Emitter.sources.USER;
    if (typeof mutations === 'string') {
      source = mutations;
    }
    if (!Array.isArray(mutations)) {
      mutations = this.observer.takeRecords();
    }
    if (mutations.length > 0) {
      this.emitter.emit(Emitter.events.SCROLL_BEFORE_UPDATE, source, mutations);
    }
    super.update(mutations.concat([]));   // pass copy
    if (mutations.length > 0) {
      this.emitter.emit(Emitter.events.SCROLL_UPDATE, source, mutations);
    }
  }
}

class ScrollBlot extends ContainerBlot {
  static blotName = 'scroll';
  static defaultChild = 'block';
  static scope = Registry.Scope.BLOCK_BLOT;
  static tagName = 'DIV';

  observer: MutationObserver;

  constructor(node: HTMLDivElement) {
    super(node);
    this.scroll = this;
    this.observer = new MutationObserver((mutations: MutationRecord[]) => {
      this.update(mutations);
    });
    this.observer.observe(this.domNode, OBSERVER_CONFIG);
    this.attach();
}可以看见这里注册了一个MutationObserver,用于监听节点内容的变化。
当编辑器改变时,会触发update方法,然后通过事件通知。这个Emitter.events.SCROLL_UPDATE在Quill的构造函数中看见过
this.emitter.on(Emitter.events.SCROLL_UPDATE, (source, mutations) => {
  let range = this.selection.lastRange;
  let index = range && range.length === 0 ? range.index : undefined;
  modify.call(this, () => {
    return this.editor.update(null, mutations, index);
  }, source);
});然后是editor.update,其内部是将DOM mutations转换成 delta
update(change, mutations = [], cursorIndex = undefined) {
  let oldDelta = this.delta;
  if (mutations.length === 1 &&
      mutations[0].type === 'characterData' &&
      mutations[0].target.data.match(ASCII) &&
      Parchment.find(mutations[0].target)) {
    // contenteditable用户主动编辑时触发的内容变化
    let textBlot = Parchment.find(mutations[0].target);
    let formats = bubbleFormats(textBlot);
    let index = textBlot.offset(this.scroll);
    let oldValue = mutations[0].oldValue.replace(CursorBlot.CONTENTS, '');
    let oldText = new Delta().insert(oldValue);
    let newText = new Delta().insert(textBlot.value());
    let diffDelta = new Delta().retain(index).concat(oldText.diff(newText, cursorIndex));
    change = diffDelta.reduce(function(delta, op) {
      if (op.insert) {
        return delta.insert(op.insert, formats);
      } else {
        return delta.push(op);
      }
    }, new Delta());
    // 更新编辑器的delta
    this.delta = oldDelta.compose(change);
  } else {
    // 快捷键、工具栏等按钮调用api更新内容时,下面会提到

    // 更新编辑器的delta
    this.delta = this.getDelta();
    if (!change || !equal(oldDelta.compose(change), this.delta)) {
      change = oldDelta.diff(this.delta, cursorIndex);
    }
  }
  return change;
}
2.4. selection
其主要功能是获取选择区域
this.emitter.listenDOM('selectionchange', document, () => {
    if (!this.mouseDown) {
    setTimeout(this.update.bind(this, Emitter.sources.USER), 1);
  }
});在选择时通过document.getSelection()获取选中区域,并封装一些快速获取选择区域的接口。关于选择区域相关的DOM Api,可以移步MDN文档。
2.5. theme
主题主要是对编辑器一些UI和交互的定制,theme是配置参数中通过expandConfig找到的构造函数
function expandConfig(container, userConfig) {
  if (!userConfig.theme || userConfig.theme === Quill.DEFAULTS.theme) {
    userConfig.theme = Theme;
  } else {
    userConfig.theme = Quill.import(`themes/${userConfig.theme}`);
    if (userConfig.theme == null) {
      throw new Error(`Invalid theme ${userConfig.theme}. Did you register it?`);
    }
  }
  // ...
}
比如示例中的配置
var editor = new Quill('#editor', {
  modules: { toolbar: '#toolbar' },
  theme: 'snow'
});最后找到的是themes/snow.js下面的SnowTheme
class SnowTheme extends BaseTheme {
  constructor(quill, options) {
    if (options.modules.toolbar != null && options.modules.toolbar.container == null) {
      options.modules.toolbar.container = TOOLBAR_CONFIG;
    }
    super(quill, options);
    this.quill.container.classList.add('ql-snow');
  }
}在初始化theme之后,可以看见通过theme.addModule添加了几个模块Module,依次看看每个模块的功能
2.6. keyboard
提供了快捷键监听的功能,
this.addBinding({ key: Keyboard.keys.ENTER, shiftKey: null }, handleEnter);比如按ctrl + B的时候加粗选中内容
makeFormatHandler('bold')

function makeFormatHandler(format) {
  return {
    key: format[0].toUpperCase(),
    shortKey: true,
    handler: function(range, context) {
      this.quill.format(format, !context.format[format], Quill.sources.USER);
    }
  };
}
比如按回车的时候需要换行
function handleEnter(range, context) {
  if (range.length > 0) {
    this.quill.scroll.deleteAt(range.index, range.length);  // So we do not trigger text-change
  }
  let lineFormats = Object.keys(context.format).reduce(function(lineFormats, format) {
    if (Parchment.query(format, Parchment.Scope.BLOCK) && !Array.isArray(context.format[format])) {
      lineFormats[format] = context.format[format];
    }
    return lineFormats;
  }, {});
  this.quill.insertText(range.index, '\n', lineFormats, Quill.sources.USER);
  // Earlier scroll.deleteAt might have messed up our selection,
  // so insertText's built in selection preservation is not reliable
  this.quill.setSelection(range.index + 1, Quill.sources.SILENT);
  this.quill.focus();
  Object.keys(context.format).forEach((name) => {
    if (lineFormats[name] != null) return;
    if (Array.isArray(context.format[name])) return;
    if (name === 'link') return;
    this.quill.format(name, context.format[name], Quill.sources.USER);
  });
}
2.7. clipboard
剪切板相关的功能,会监听根节点的paste事件
其实现很有意思,会使用1个隐藏的DOM接地那.ql-clipboard来暂存剪切板中的内容,并将其contenteditable设置为true。
在onPaste的时候,通过container.focus()将粘贴板的内容更新到这个container中,然后在将其内容转换成delta,最后更新到quill编辑器中
class Clipboard extends Module {
  constructor(quill, options) {
    super(quill, options);
    this.quill.root.addEventListener('paste', this.onPaste.bind(this));
    // 用来承接粘贴板中的内容
    this.container = this.quill.addContainer('ql-clipboard');
    this.container.setAttribute('contenteditable', true);
    this.container.setAttribute('tabindex', -1);
    this.matchers = [];
    CLIPBOARD_CONFIG.concat(this.options.matchers).forEach(([selector, matcher]) => {
      if (!options.matchVisual && matcher === matchSpacing) return;
      this.addMatcher(selector, matcher);
    });
  }

  onPaste(e) {
    if (e.defaultPrevented || !this.quill.isEnabled()) return;
    let range = this.quill.getSelection();
    let delta = new Delta().retain(range.index);
    let scrollTop = this.quill.scrollingContainer.scrollTop;
    // 在ctrl + v的时候接收粘贴板的内容
    this.container.focus();
    this.quill.selection.update(Quill.sources.SILENT);
    // 粘贴板内容收到之后,再解析并将其转换成delta
    setTimeout(() => {
      delta = delta.concat(this.convert()).delete(range.length);
      this.quill.updateContents(delta, Quill.sources.USER);
      // range.length contributes to delta.length()
      this.quill.setSelection(delta.length() - range.length, Quill.sources.SILENT);
      this.quill.scrollingContainer.scrollTop = scrollTop;
      this.quill.focus();
    }, 1);
  }
}因此粘贴板需要实现HTML代码转换成delta的功能,在convert方法中
function convert(){
  // ...
  traverse(this.container)
}

function traverse(node, elementMatchers, textMatchers) {  // Post-order
  if (node.nodeType === node.TEXT_NODE) {
    return textMatchers.reduce(function(delta, matcher) {
      return matcher(node, delta);
    }, new Delta());
  } else if (node.nodeType === node.ELEMENT_NODE) {
    return [].reduce.call(node.childNodes || [], (delta, childNode) => {
      let childrenDelta = traverse(childNode, elementMatchers, textMatchers);
      if (childNode.nodeType === node.ELEMENT_NODE) {
        childrenDelta = elementMatchers.reduce(function(childrenDelta, matcher) {
          return matcher(childNode, childrenDelta);
        }, childrenDelta);
        childrenDelta = (childNode[DOM_KEY] || []).reduce(function(childrenDelta, matcher) {
          return matcher(childNode, childrenDelta);
        }, childrenDelta);
      }
      return delta.concat(childrenDelta);
    }, new Delta());
  } else {
    return new Delta();
  }
}
会逐个遍历container的子节点,然后做对应的格式化处理,拼接delta操作列表。
2.8. history
history模块主要提供undo和redo的功能,其实现也比较简单,在quill编辑器内容变化时,保存变化前后的delta
class History extends Module {
  constructor(quill, options) {
    super(quill, options);
    this.lastRecorded = 0;
    this.ignoreChange = false;
    this.clear();
    this.quill.on(Quill.events.EDITOR_CHANGE, (eventName, delta, oldDelta, source) => {
      if (eventName !== Quill.events.TEXT_CHANGE || this.ignoreChange) return;
      if (!this.options.userOnly || source === Quill.sources.USER) {
        this.record(delta, oldDelta);
      } else {
        this.transform(delta);
      }
    });
    this.quill.keyboard.addBinding({ key: 'Z', shortKey: true }, this.undo.bind(this));
    this.quill.keyboard.addBinding({ key: 'Z', shortKey: true, shiftKey: true }, this.redo.bind(this));
    if (/Win/i.test(navigator.platform)) {
      this.quill.keyboard.addBinding({ key: 'Y', shortKey: true }, this.redo.bind(this));
    }
  }
  // ...
}
在接收到undo/redo等指令后,会从对应的操作栈中弹出相关delta记录,重新更新即可
2.9. toolbar
工具栏是编辑器UI中非常重要的部分
3. Parchment
3.1. 引子
我们先总结一下quill中编辑内容的几种方式
- 借助
contenteditable直接输入文本内容,由浏览器转换成HTML,完成内容的更新,editor会监听内容变化同时更新delta - 从粘贴板粘贴内容,会由
clipboard模块将内容focus到一个临时DOM节点中,再将HTML解析成delta,通过quill.updateContents(delta)更新编辑器内容 - 通过工具栏的按钮或者某些快捷键,通过
quill.format、quill.insertText等Api更新内容。
前两者在我们已经有了大概的了解,接下来看看这些通过Api更新内容的流程。
以在第一个章节中对World!进行加粗的操作为例打断点分析一下
对应的delta是
{
  "attributes": {
      "bold": true
  },
    "insert": "World!"
}最后由editor.formatText方法来处理
// quill/core/editor.js
formatText(index, length, formats = {}) {
  Object.keys(formats).forEach((format) => {
    this.scroll.formatAt(index, length, format, formats[format]);
  });
  return this.update(new Delta().retain(index).retain(length, clone(formats)));
}editor.update这个方法在上面已经分析过了,主要是更新editor本身的delta。实际内容更新的处理逻辑是放在scroll.formAt中进行的。
scroll就是在Quill构造函数中通过parchment.create创建的,这就回到了这章节的主角
3.2. parchment
parchment单词的原意是“羊皮纸”,他是Quill的文档模型,抽象出了一套文本编辑器中操作DOM的数据结构,一个parchment tree由Blots(字迹、墨水,就像是羊皮纸上要用墨水写上字)组成,blot提供了构建DOM、格式化、增添内容等基础功能。
简单来说,Blot就是一个封装了DOM操作的抽象对象。
我们继续回到scroll.formatAt,看看Blot是如何操作DOM的。
前面整理了scroll是在blots/scroll中定义的,看看源码
class Scroll extends Parchment.Scroll {
  formatAt(index, length, format, value) {
    if (this.whitelist != null && !this.whitelist[format]) return;
    super.formatAt(index, length, format, value);
    this.optimize();
  }
}

class ScrollBlot extends ContainerBlot {
  formatAt(index: number, length: number, name: string, value: any): void {
    this.update();
    super.formatAt(index, length, name, value);
  }
}

class ContainerBlot extends ShadowBlot implements Parent {
  formatAt(index: number, length: number, name: string, value: any): void {
    this.children.forEachAt(index, length, function(child, offset, length) {
      child.formatAt(offset, length, name, value);
    });
  }
}首先Scroll继承了ContainerBlot,顾名思义,ContainerBlot是容器类,有children属性,关于各种Bolt的相关接口,可以后面再看。
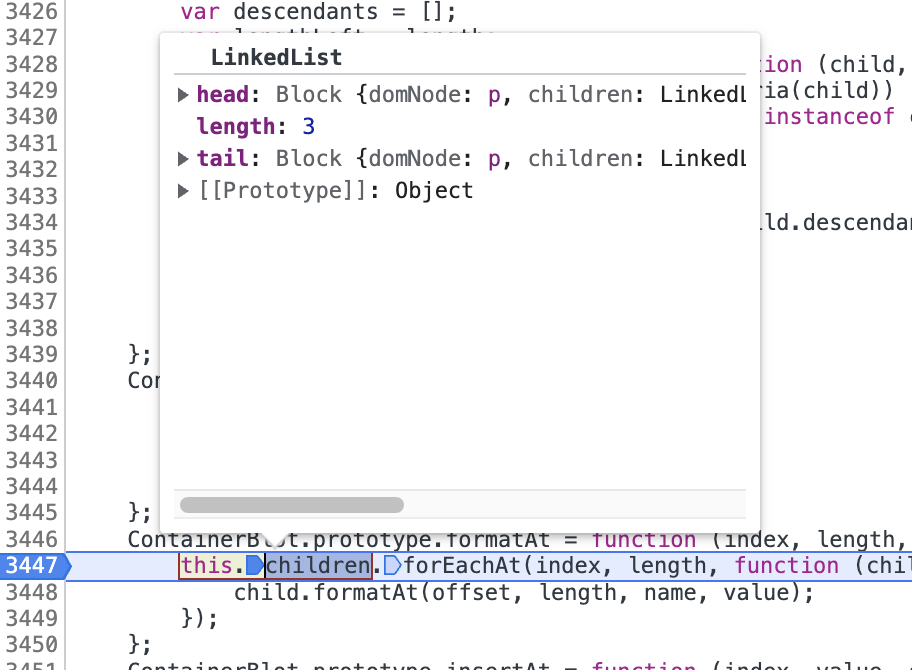
children是一个链表,因此this.children.forEachAt(index)就是找到对应index的节点,然后执行回调内的操作
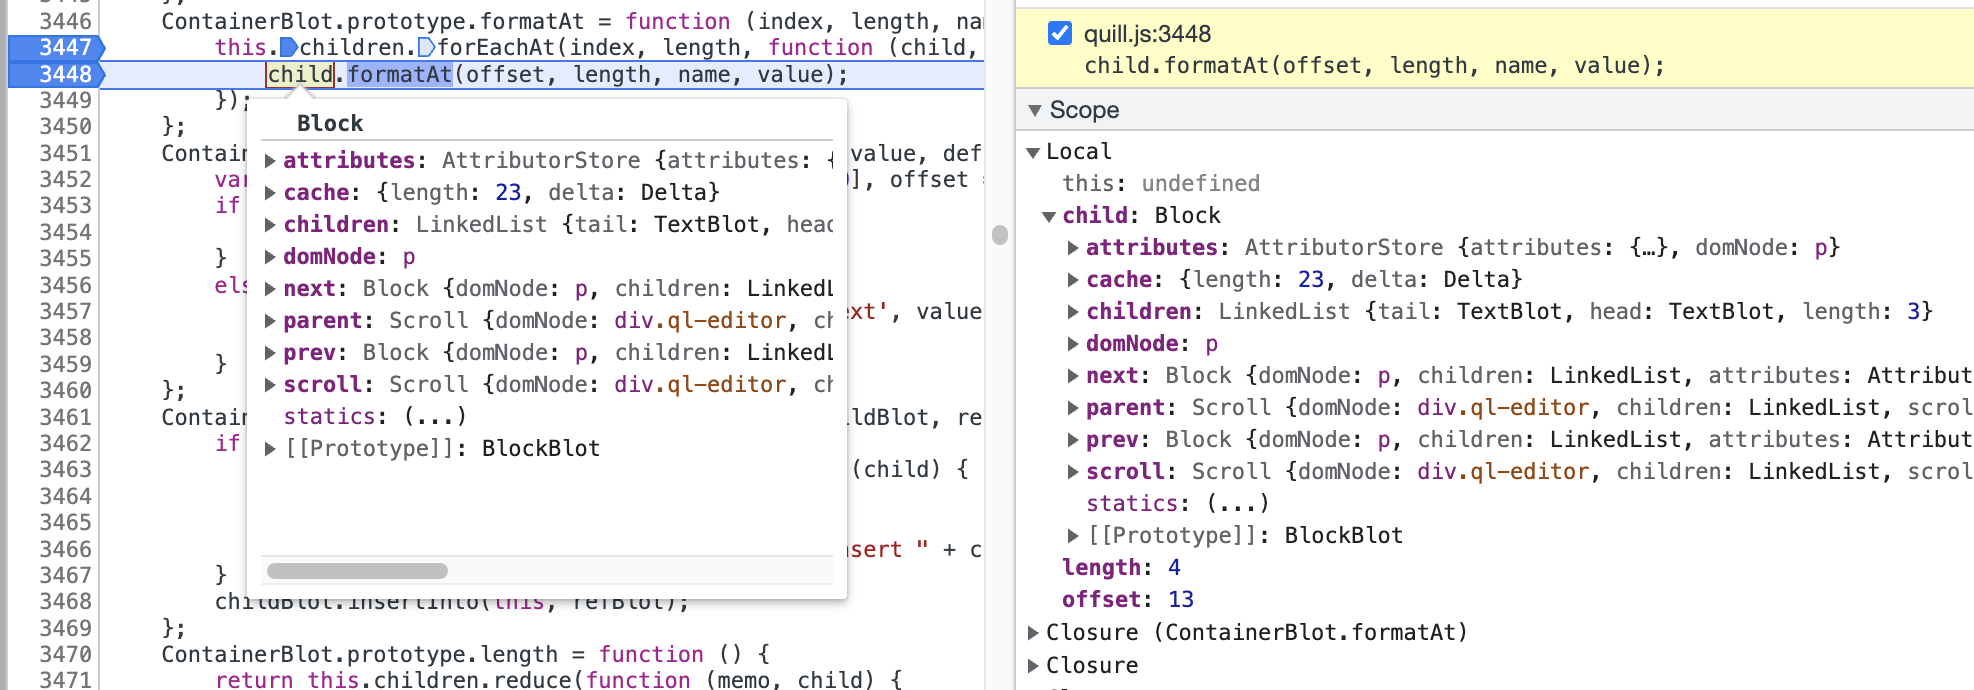
在这个位置找到的是一个Block对应p标签,然后调用formatAt,一层一层断点打过去,最后定位到TextBlot对应选中的text元素
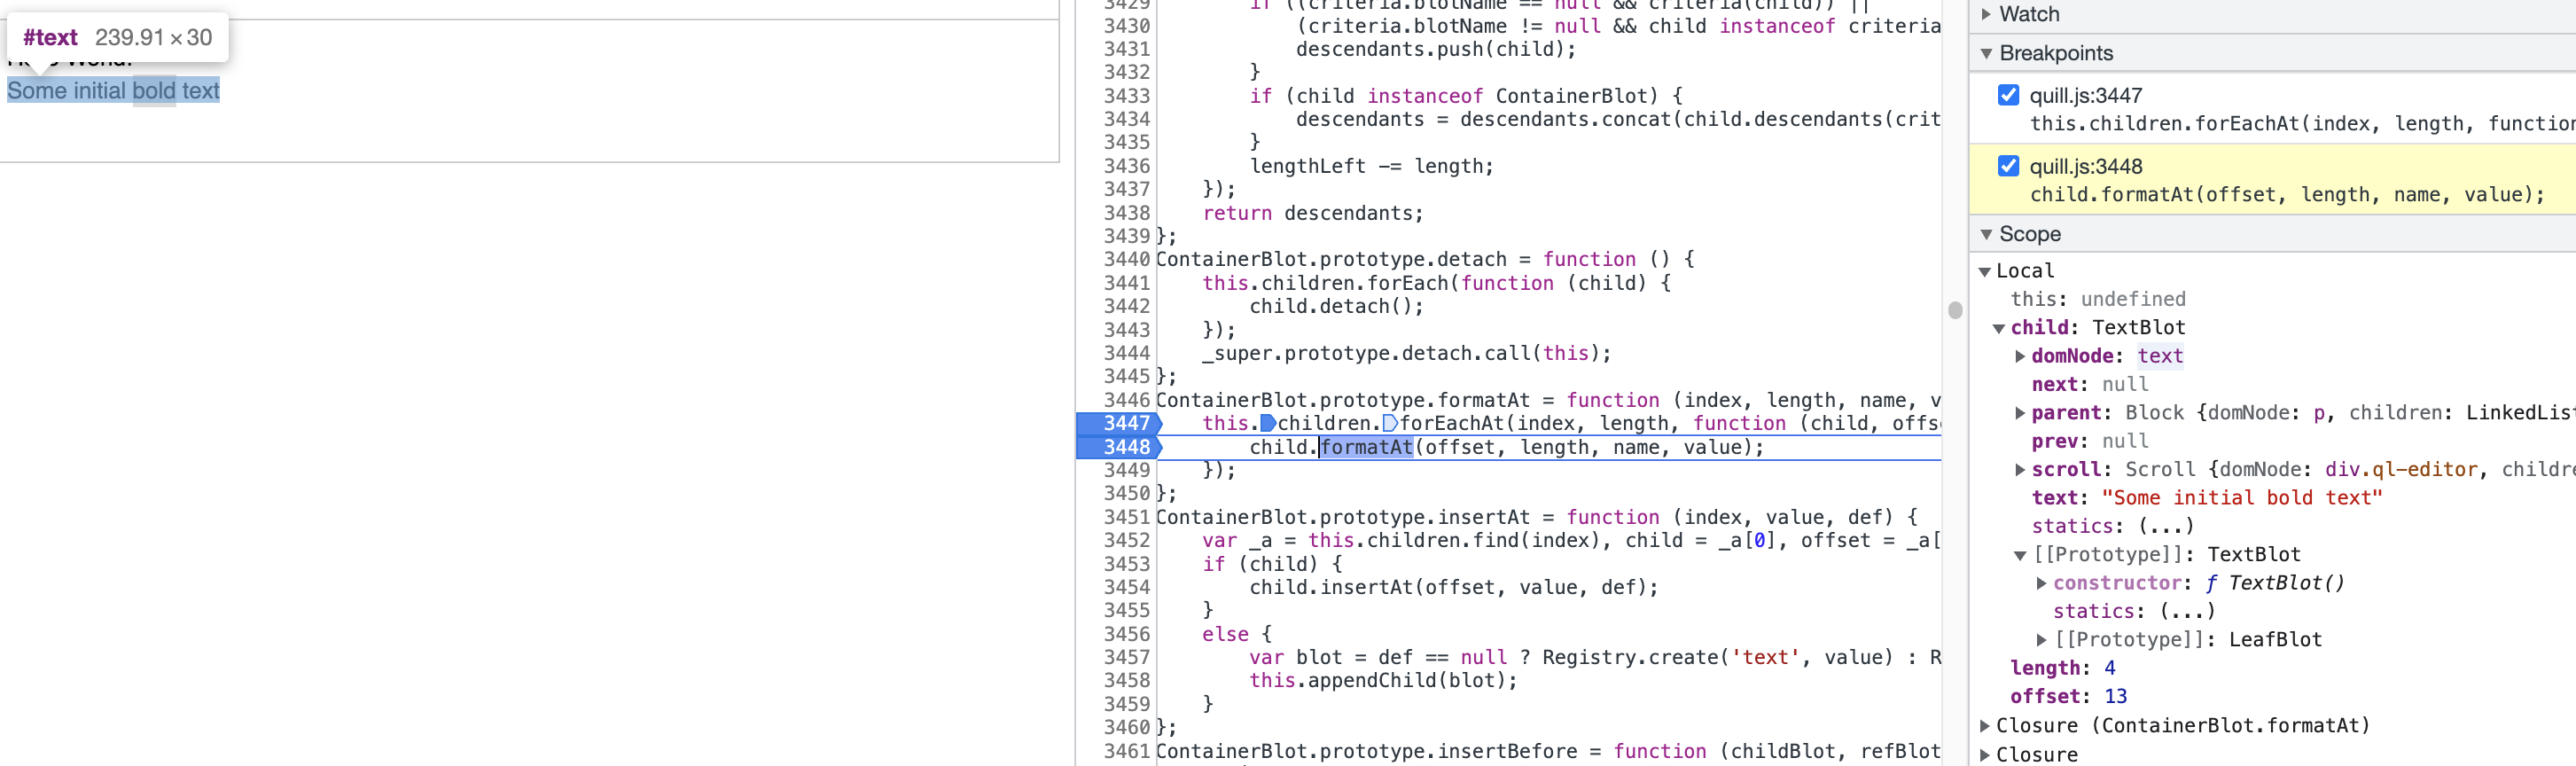
继续断点
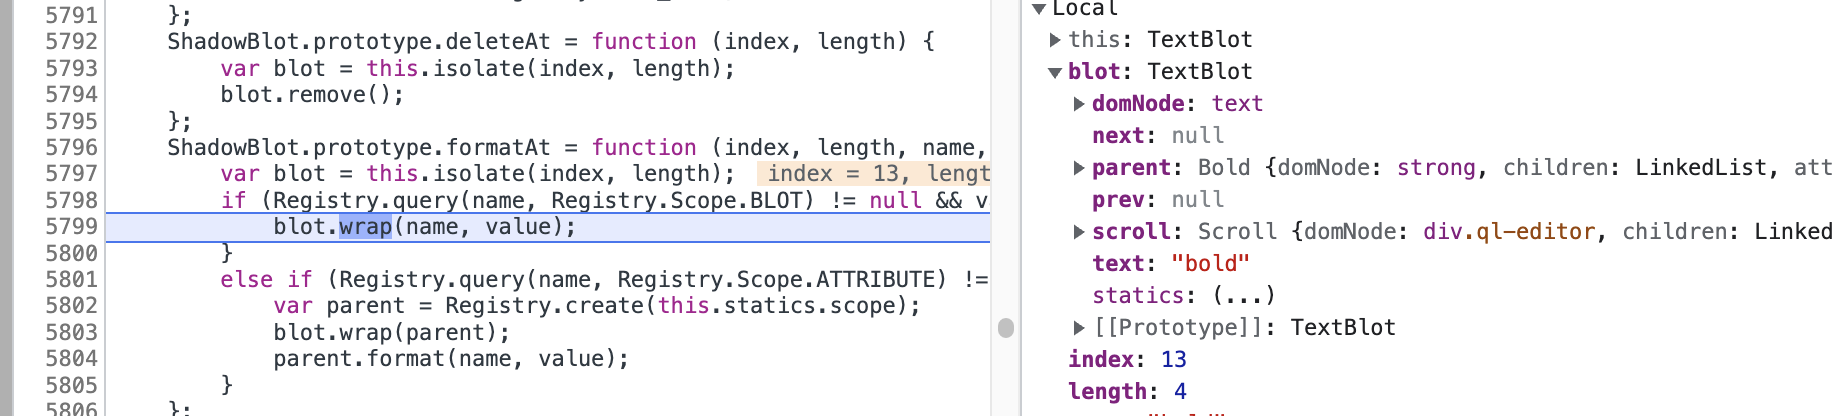
终于找到了操作DOM的地方
class ShadowBlot implements Blot {
  formatAt(index: number, length: number, name: string, value: any): void {
    let blot = this.isolate(index, length);
    if (Registry.query(name, Registry.Scope.BLOT) != null && value) {
      blot.wrap(name, value);
    } else if (Registry.query(name, Registry.Scope.ATTRIBUTE) != null) {
      let parent = <Parent & Formattable>Registry.create(this.statics.scope);
      blot.wrap(parent);
      parent.format(name, value);
    }
  }

  wrap(name: string | Parent, value?: any): Parent {
    // Registry.create('bold')创建BoldBlot
    let wrapper = typeof name === 'string' ? <Parent>Registry.create(name, value) : name;
    if (this.parent != null) {
      // 调用DOM接口,同时更新children链表
      this.parent.insertBefore(wrapper, this.next);
    }
    // 将TextBolt插入到BoldBlot
    wrapper.appendChild(this);
    return wrapper;
  }
}这里又看到了熟悉的Registry.create。因此,如果想要自定义一些Blot,就需要先Parchment.register注册才行。
加粗是在Quill中内置的一个Blot
// quill/formats/bold.js
class Bold extends Inline {
  static create() {
    return super.create();
  }

  static formats() {
    return true;
  }

  optimize(context) {
    super.optimize(context);
    if (this.domNode.tagName !== this.statics.tagName[0]) {
      this.replaceWith(this.statics.blotName);
    }
  }
}

Bold.blotName = 'bold';
Bold.tagName = ['STRONG', 'B'];看起来非常简单。我们也可以参考编写类似的Blot,比如red标签等等
const Inline = Quill.import('blots/inline')
export class RedColorTag extends Inline {}

RedColorTag.blotName = 'colorRed'
RedColorTag.tagName = 'RED'Blot定义了很多静态方法,在需要的时候可以去了解一下具体用途
export interface Blot extends LinkedNode {
  scroll: Parent;
  parent: Parent;
  prev: Blot;
  next: Blot;
  domNode: Node;

  attach(): void;
  clone(): Blot;
  detach(): void;
  insertInto(parentBlot: Parent, refBlot?: Blot): void;
  isolate(index: number, length: number): Blot;
  offset(root?: Blot): number;
  remove(): void;
  replace(target: Blot): void;
  replaceWith(name: string, value: any): Blot;
  replaceWith(replacement: Blot): Blot;
  split(index: number, force?: boolean): Blot;
  wrap(name: string, value: any): Parent;
  wrap(wrapper: Parent): Parent;

  deleteAt(index: number, length: number): void;
  formatAt(index: number, length: number, name: string, value: any): void;
  insertAt(index: number, value: string, def?: any): void;
  optimize(context: { [key: string]: any }): void;
  optimize(mutations: MutationRecord[], context: { [key: string]: any }): void;
  update(mutations: MutationRecord[], context: { [key: string]: any }): void;
}
4. 小结
富文本编辑器是前端经常遇见的业务场景,大多数时候都是使用第三方库,并没有过多关心其内部实现。
本文通过阅读quill和相关核心依赖库的源码,了解了富文本组件的实现原理,也知道如何对quill进行定制和扩展,还是颇有收获的。